At William Osler Heath System, symptomatic patients with large hiatus hernias are offered a laparoscopic hiatus hernia repair.
This will relieve patient symptoms, and should eliminate the risk of catastrophic complications. Although we feel that the risk of gastric strangulation from acute volvulus has been over-stated in the literature, if it occurs the mortality is very high. Performed electively, and at an experienced center, a laparoscopic hiatus hernia repair is safe with excellent long term symptom control.
Massive hiatus hernia repairs are technically very challenging. As quality of life is the main indication for repair, a poor outcome can have profound and long-term repercussions for the patient.
Before Surgery
At Osler, prior to any surgical intervention for a hiatus hernia, the following tests are performed:
- Barium Swallow: This provides valuable information that may be difficult to appreciate during endoscopy. Features that can be assessed include: esophageal length, motility, and the presence of volvulus.
- Endoscopy: Direct visualization of the esophagus is critical prior surgery to rule out strictures, Barrett’s esophagus, or malignancy. Esophageal length and gastric anatomy can also be evaluated
- We do NOT typically perform 24-hour pH and manometry testing. As the primary issue is a mechanical distortion, the outcome of the study will not alter management. Also, placing the probe at the GEJ is technically challenging, with the potential for inaccurate results.
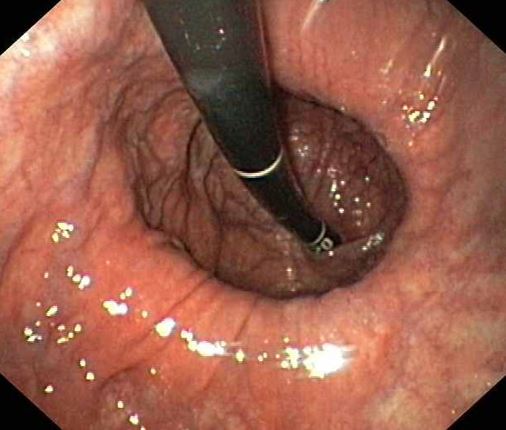
Figure 1: A retroflexed view demonstrating a giant hiatus hernia
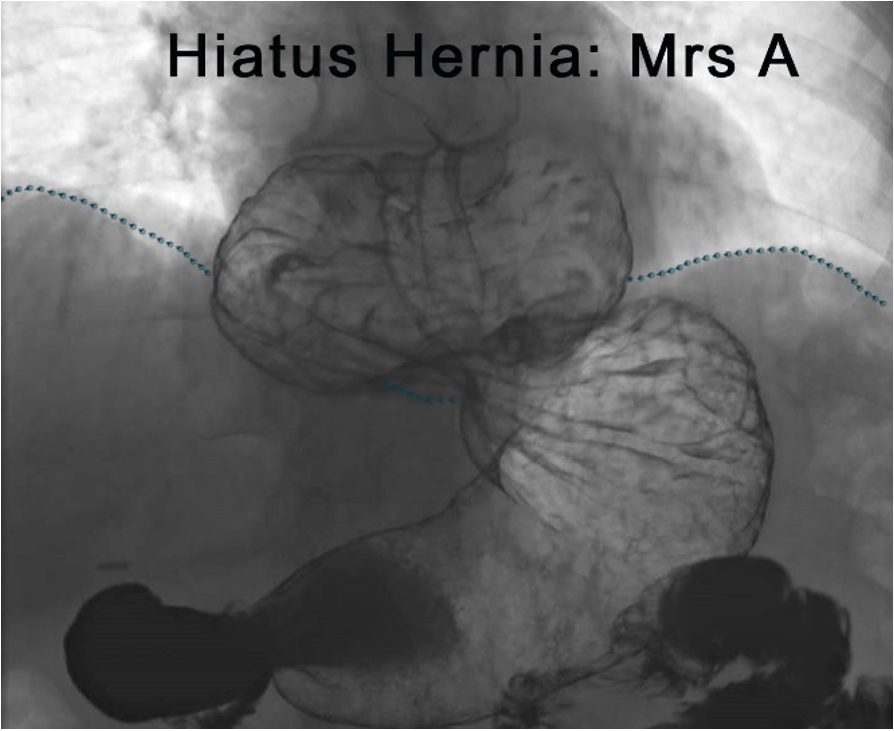
Figure 2: An example of a barium swallow image in a patient with hiatus hernia
Patient and Surgeon Positioning and Port Placement
- The patient is positioned supine on the operating table with both arms at 90°.
- The patient should as far the right of the bed as possible. This allows the liver retractor more range of motion
- Place a footboard at the base of bed. This prevents the patient from sliding caudally if the surgeon requires steep reverse Trendelenburg to aid in hiatal exposure.
- The surgeon works on the right side of the patient with the assist on the right. The assist holds a 30° camera in his left hand and a grasper with his left.

Figure 3: Patient and surgeon positioning
Port Placement
At Osler, we use 5 ports. We use four 5 mm ports and one 10 mm port.
- A line from the xiphoid to the umbilicus is drawn, and this line is divided in three. The ports should be around the level of the top third mark. This may seem high; however, it allows improved access to the mediastinum to ensure adequate esophageal mobilization. As most patients with large hiatus hernias have a short or contracted esophagus, extensive mediastinal dissection will provide more esophageal length.
- The assist port is placed at the level of the upper third line below the left costal margin, at the mid clavicular line. A Veress needle is placed here to insufflate the peritoneal cavity.
- The camera port should be 3 fingerbreadths to the right of the midline, slightly below the line.
- The 10mm working port should be 2 fingerbreadths to the left of the midline, at the level of the line.
- The surgeons working port should be slightly above the marked line and far enough from to 10mm port to prevent crowding.
- The liver retractor port should be placed last. The port should be inserted as posterior as possible and at the level of the liver edge to allow for maximal anterior displacement of the liver. It is secured to a stationary holding device (Mediflex®).
- The patient is then placed into steep revers Trendelenburg.
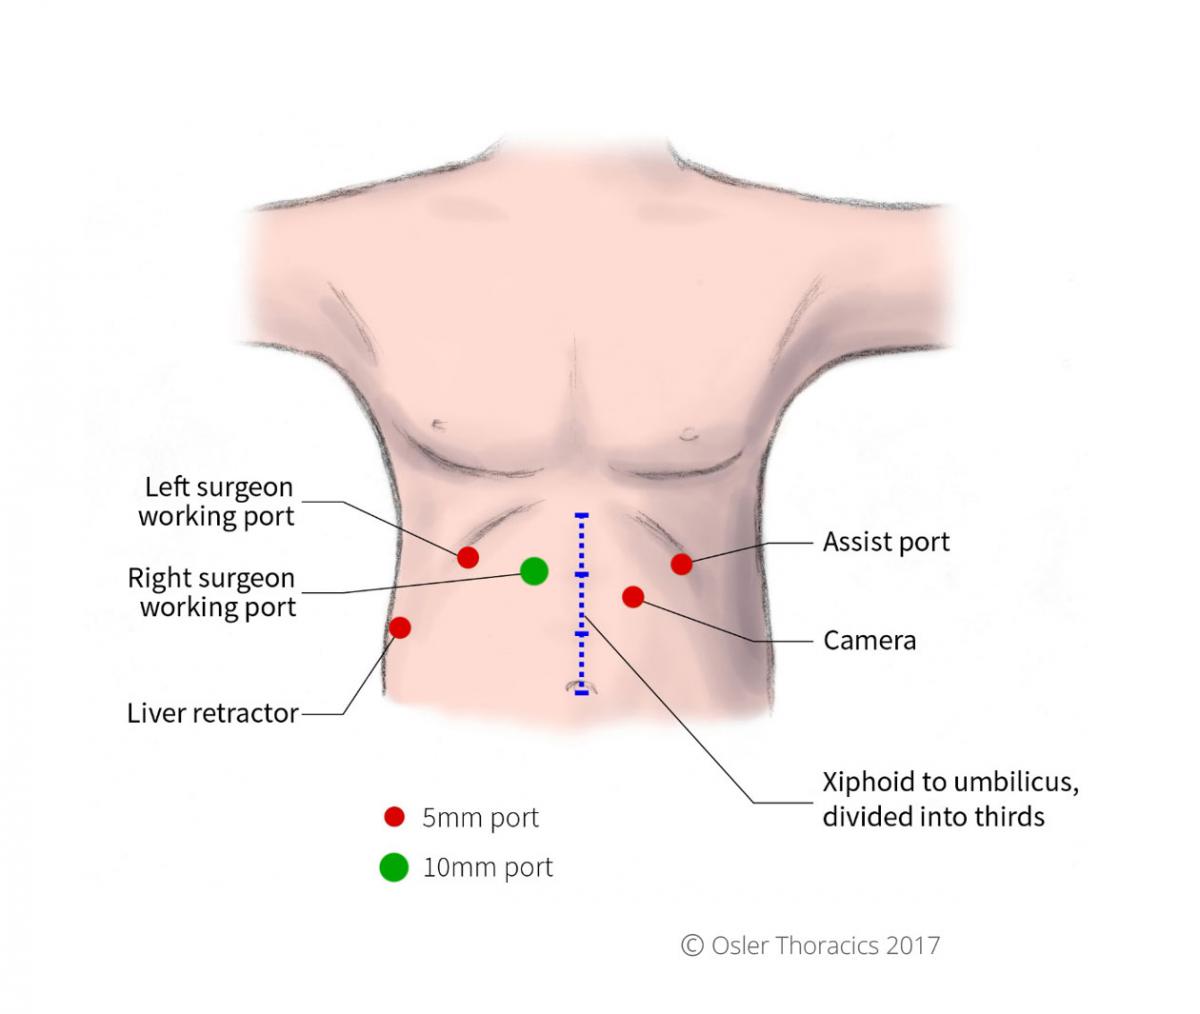
Figure 4: Port placement
Initial Dissection of Anterior Sac
After exposing the hiatus, the herniated stomach is reduced into the abdomen using atraumatic graspers. Minimal manipulation of the stomach is suggested as a chronically herniated stomach may be more susceptible to traumatic injury. Frequently with insufflation and reverse Trendelenburg, a good part of the stomach spontaneously reduces into the abdomen.
Pearl #1: The Anterior Sac Eversion and Dissection
As the first step in a successful repair, it is also the most critical part of the entire operation. This step can be performed without touching the stomach, and once complete will have reduced a lot of the mediastinal pull on the stomach. As the hernia sac also contains the peritoneal lining of the gastric cardia, reduction of the sac will also reduce the stomach.
- Using the left assist port and the right grasping port, grab the tense peritoneal sac and pull it into the abdomen.
- Identify the dissection line on the anterior part of the hiatus. This line represents the line created where the herniated peritoneum meets the attenuated phreno-esophageal ligament.
- Create a horizontal line of dissection. Progress into the mediastinum making sure you are in the plane between the sac and the pericardium. This dissection should be bloodless, with thin foamy white tissue that can be cleared easily. Dissect this anterior plane as far as possible.
- The right pleura is often visualized and should be avoided as the airway pressures may increase if the pleural space is entered.
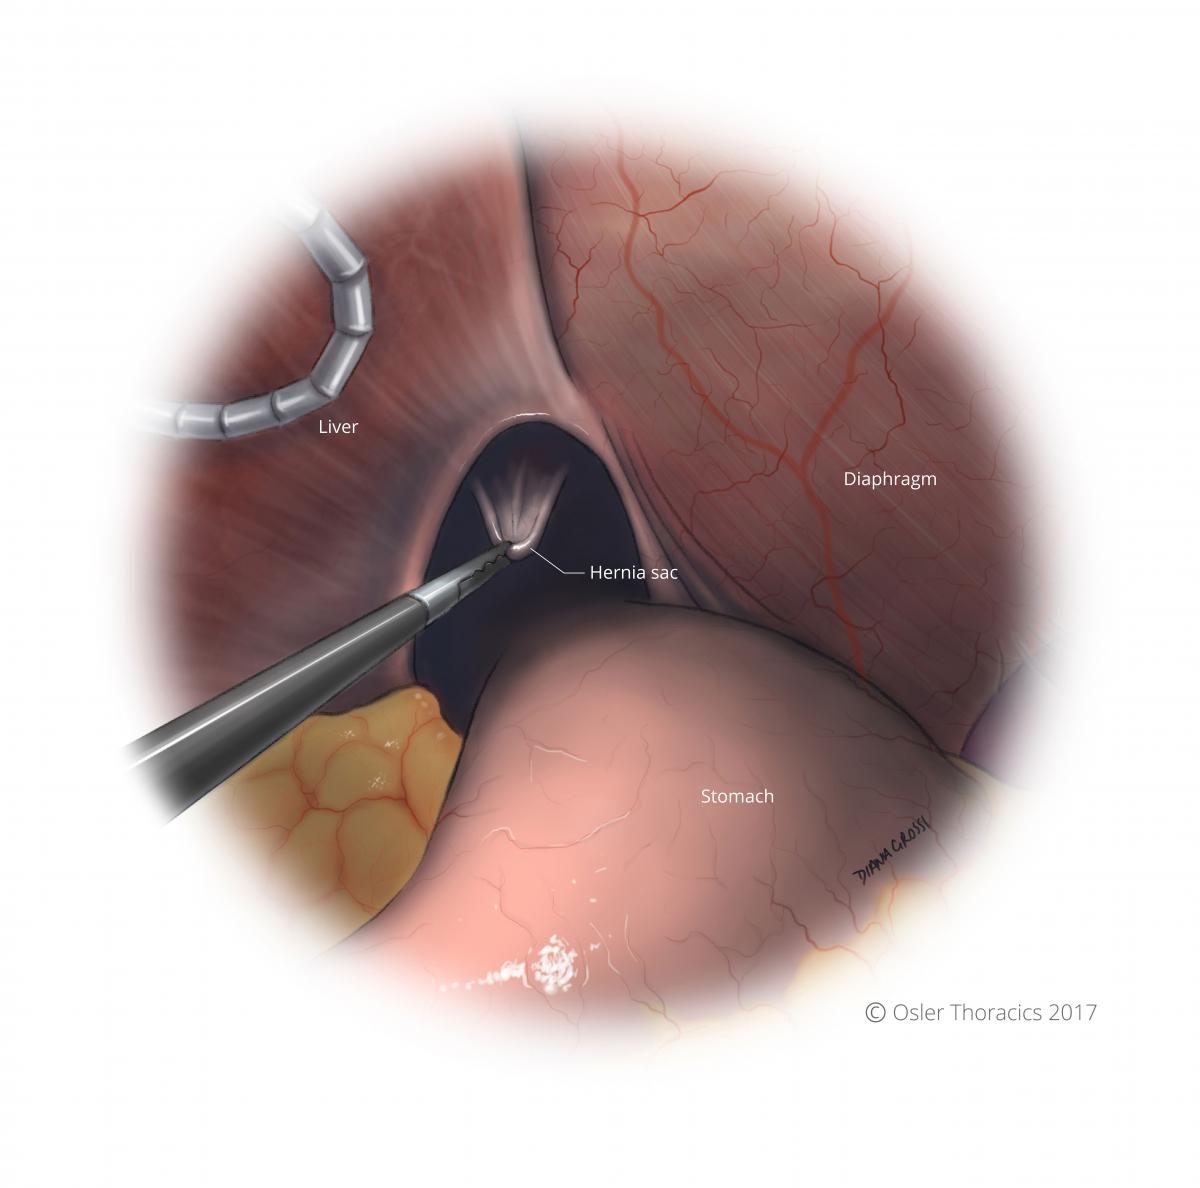
Figure 5: Initial anterior sac eversion into abdomen
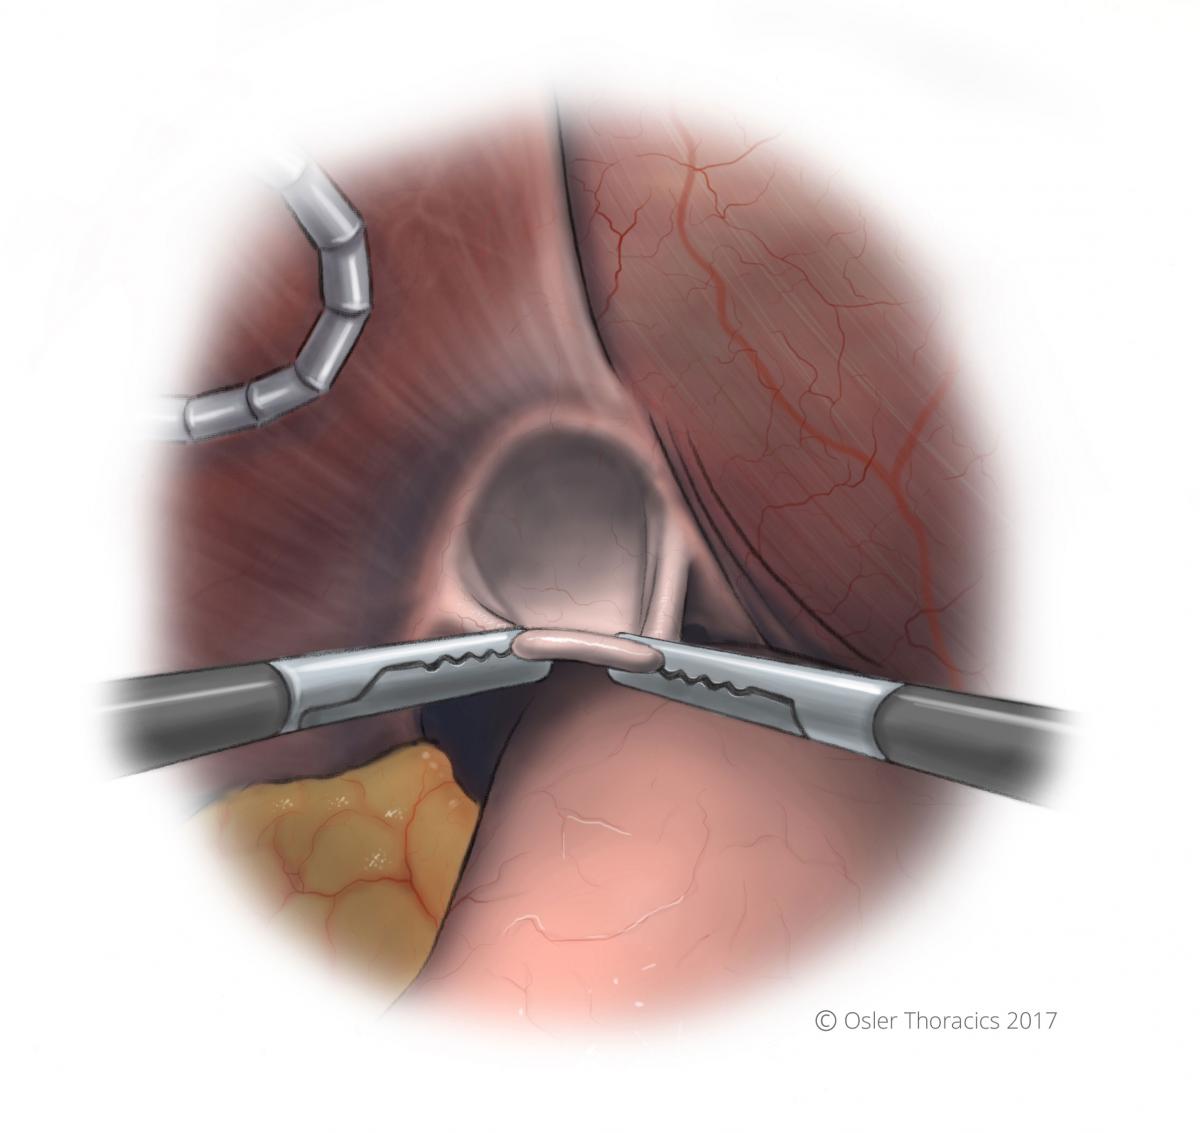
Figure 6: Anterior sac everted

Figure 7: A line of dissection is created

Figure 8: Line of dissection is continued and maintained in the avascular plane between the hernia sac and pericardium
Pearl #2: The Sac Rollout
Still without manipulating the herniated stomach, the majority of the sac is pulled out of the mediastinum using the Rollout approach:
- Using the left assist grasper and the surgeon’s grasper, the sac is pulled inferiorly. This hard “pull” is critical for exposure.
- As the avascular foamy layer is cleared, both graspers are sequentially moved superiorly. With each regrasping, the harmonic scalpel is used to clear the connective tissue anteriorly and laterally.
- This is done repeatedly, resulting in the sac to roll out of the mediastinum.
- This is continued until the esophagus and anterior vagus nerve is visualized.
- As the dissection continues the both pleura con be identified and freed from the peritoneal sac.
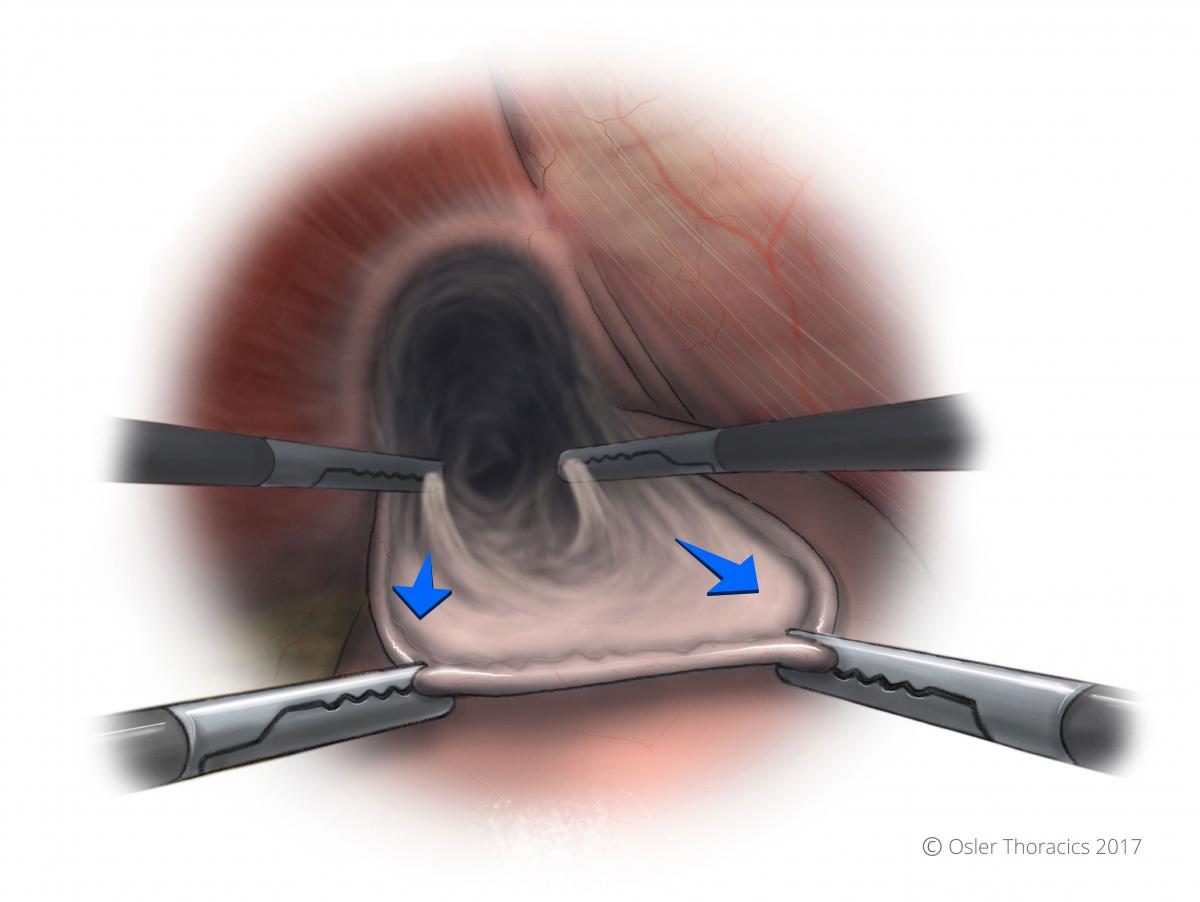
Figure 9: Two-point grasping is used for the sac rollout

Figure 10: The anterior vagus nerve and GEJ fat pad exposed after sac rollout
Crural Dissection
Once the anterior sac is mobilized, the right crura can be mobilized. It is critical to preserve the peritoneal lining of the crurae, as it can strengthen the closure. As much of the left crura is mobilized prior to proceeding to Step 4. Disrupted peritoneal integrity over the crurae can lead to early dehiscence.
The Short Gastrics
In patients with large hiatus hernias, the short gastrics are lengthened, and the fibrofatty tissue harboring them is thickened. In fact, occasionally the edge of the gastric wall is difficult to visualize, increasing the risk of gastric injury.
Once the left and right crurae are mobilized, the posterior part of the hernia sac can be dissected out of the mediastinum.
Extensive Esophageal Mobilization
A foreshortened esophagus is frequent in patients with hiatus hernias. It is therefore critical to mobilize the esophagus as high up in the mediastinum as is required. We have found that the esophagus can be safely mobilized up the inferior pulmonary veins. Mobilize the esophagus circumferentially but beware of a few pitfalls:
- Aortoesophageal vessels must be recognized and controlled using the harmonic scalpel. Bleeding will turn the nice foamy dissection layer into a bloody surgical site. This also avoids mediastinal hematomas which can present with significant dysphagia post-operatively
- Posterior vagus nerve may be floppy and prone to injury. The anterior vagus nerve sits on top of the esophagus, however the posterior nerve can well away from the wall, making it very susceptible to thermal injury. Some advocate transecting the nerve to gain esophageal length. This practice should be condemned as it adds little length and may result in post-operative gastroparesis.
- Minimize grasping of the esophagus as it lacks serosa. The two muscular layers of the esophagus are prone to traumatic injury. Although circumferential dissection of the esophagus requires extensive manipulation, this can be achieved using the following three tricks:
- The “Right Crus View”: Having your assist lean on the esophagus, pushing it the the left of the patient while the surgeon leans on the right crus
- The “Left Crus View” :The surgeon can grab the GEJ fat pad, pulling it to the left while the assist leans on the left crus.
- The “Penrose Move”: The assist hooks under the esophagus and posterior vagus and lifts anteriorly. The surgeon leans on the right crus. This allows to extensive posterior dissection.
- The “Pericardial Lift”: The surgeon lifts anterior decussation of the crurae and the pericardium, while the assist pulls the GEJ fat pad inferiorly and posteriorly. This allows for anterior esophageal dissection.
- Even after extensive mobilization, the GEJ may not be adequately subdiaphragmatic. The surgeon must be prepared to perform a Collis Gastroplasty. We typically perform a wedge gastroplasty using a 48 French bougie.
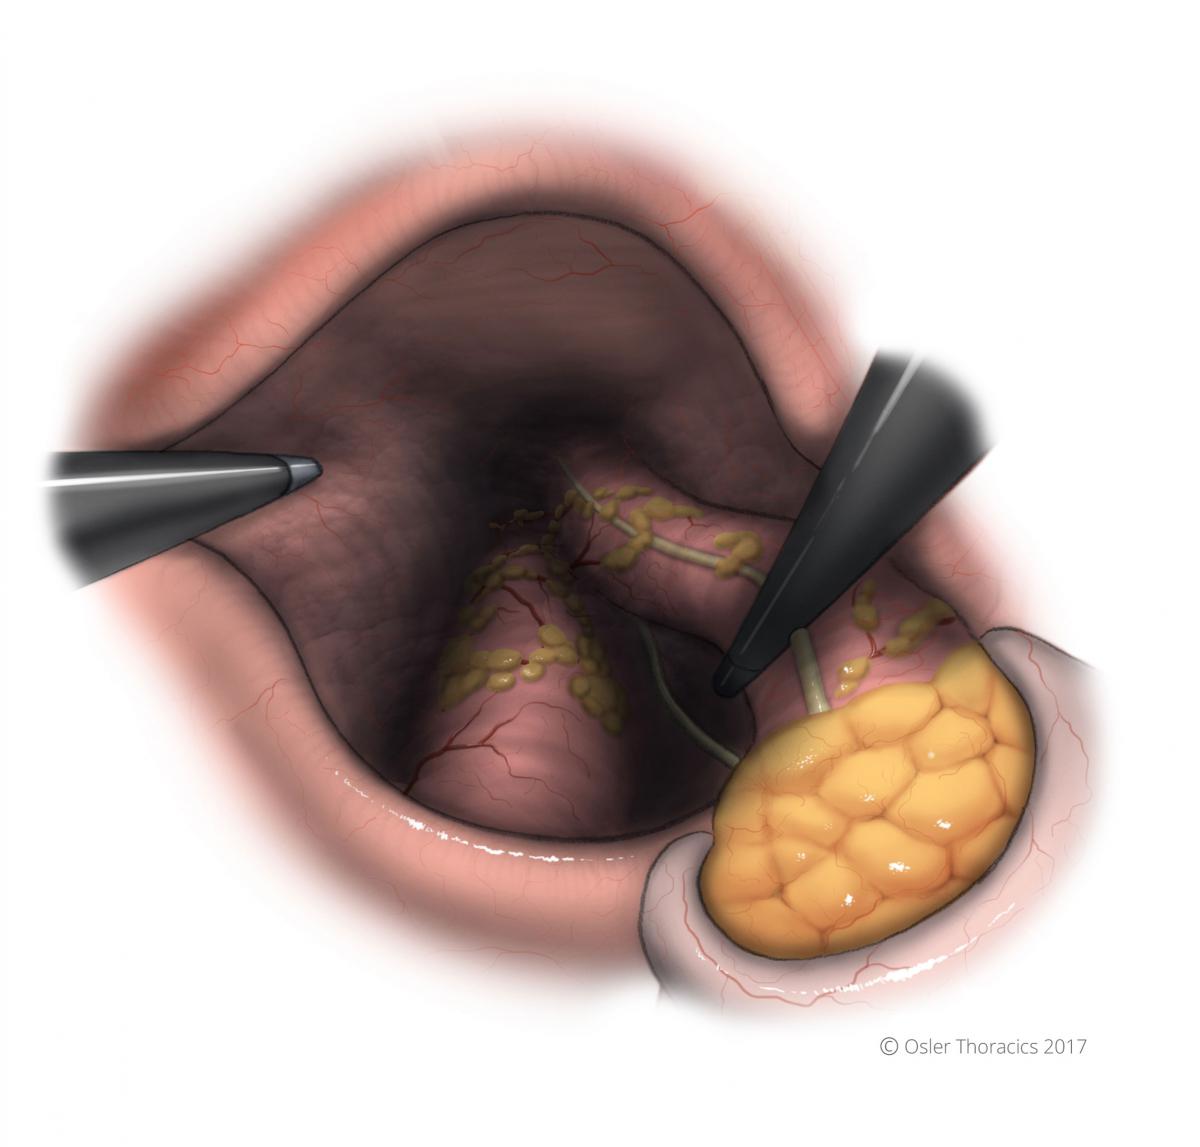
Figure 11: The Right Crus View

Figure 12: The Left Crus View

Figure 13: The Penrose Move
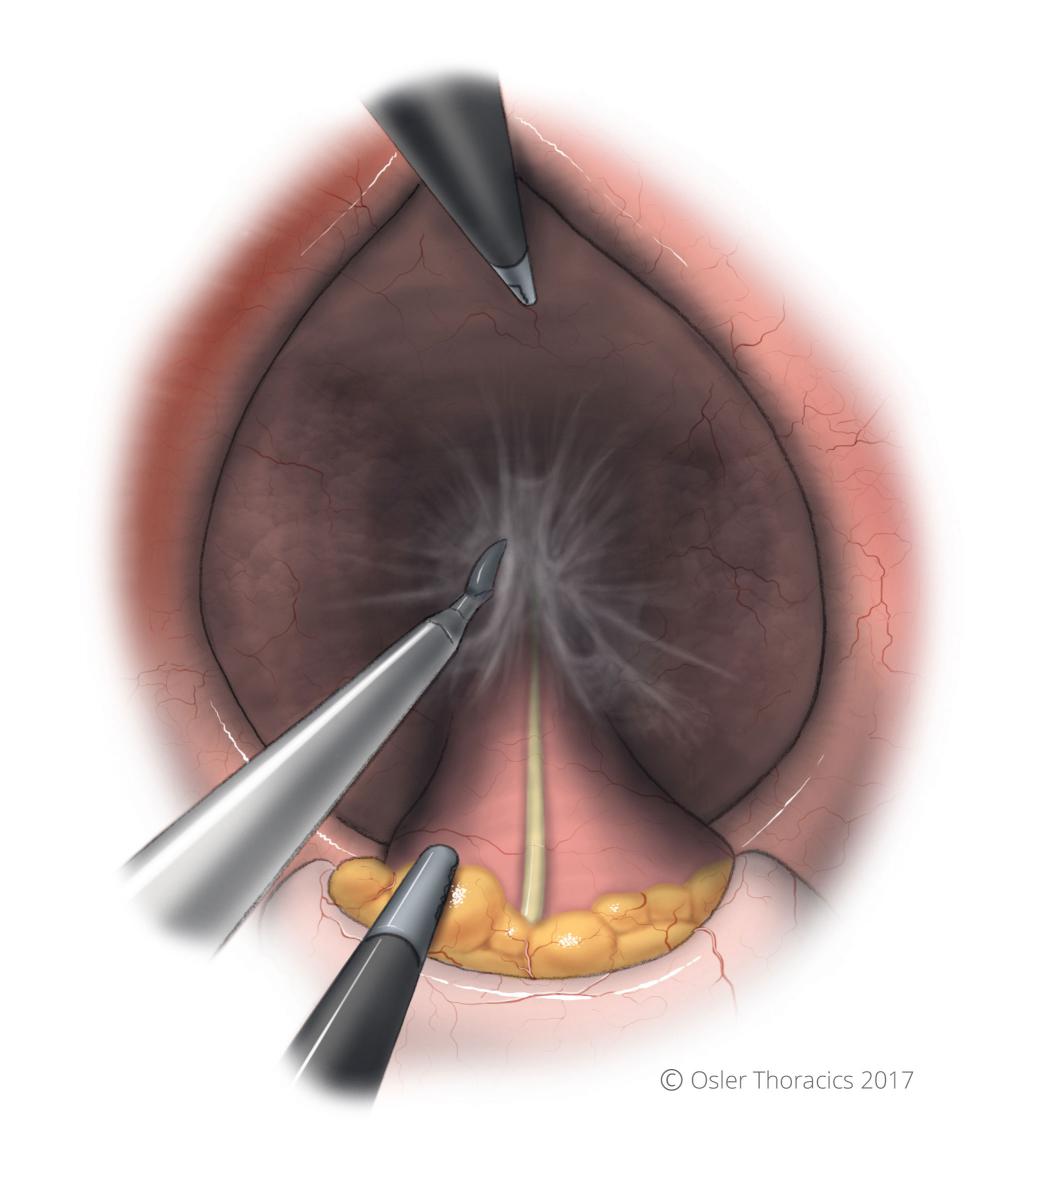
Figure 14: The Pericardial Lift
Pearl #3: Surgeon on the Left for Esophageal Mobilization
For a successful repair of the hiatus hernia, the surgeon needs to extensively release the esophagus from its mediastinal attachments. Ideally, 2-3 cm of esophagus must be intraabdominal. This reduced the upward pull on the stomach and recreates the pressure gradient at the GEJ that contributes to the lower esophageal pressure.
After mobilizing the esophagus as much as possible from the right side, more mobilization can be achieved by dissecting the esophagus with the surgeon moving to the left of the patient. Both the camera and the assistant will also move to the contralateral side.
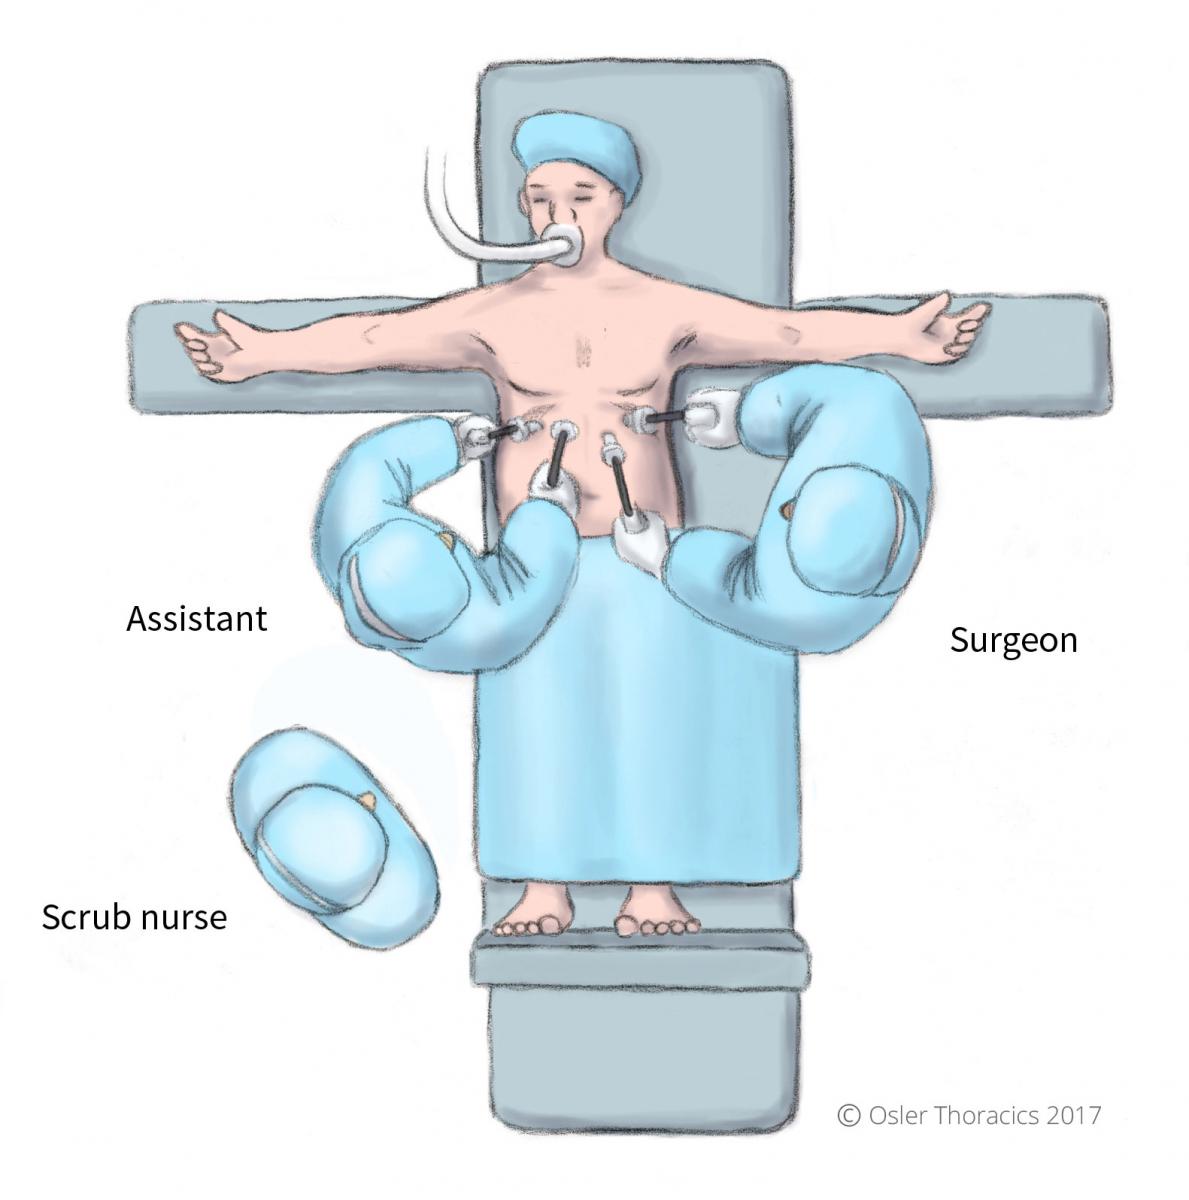
Figure 15: Surgeon position change
Repairing the Hiatus
At Osler, we avoid using prosthetic meshes to repair the hiatus. We feel that over 90% can be primarily repaired with minimal tension.
Pearl #4: Pleurotomy for Crural Relaxation
Tension free closure of the crurae is critical for a successful repair.
Reduction of tension can be achieved by introducing air into the left pleural space. This can be achieved by placing a left pleural port and insufflating the chest. However, at Osler we make a small hole in the left pleura and allow air into the pleural space via the hiatus. Pleurotomy is now routine for us at is makes the crural closure much easier. We do not promote the use of a relaxing incision as it may result in phrenic nerve injury, eventration, and may result in a future diaphragmatic hernia. We use the following guidelines:
- Inform the anesthesiologist about your intent. There will be a moderate increase in airway pressures. If the patient has limited pulmonary reserve, lower intra-abdominal pressures may be required.
- If the right pleura has also been compromised, the intentional left pleurotomy may not be well tolerated.
- The surgeon uses his grasper and harmonic scalpel to make a small cut in the left pleura. This will result in a floppy left hemidiaphragm.
- The crural repair is completed.
- We do not routinely place a chest tube into the left pleural space, as the majority of air can be “pushed” into the peritoneal cavity with positive pressure ventilation following the surgical procedure.

Figure 16: Pleurotomy of left pleura
Pearl #5: The Horizontal Cruroplasty
Frequently the left crura bows out significantly in patients with large hiatus hernias. The right crura is often thicker and maintains it’s vertical position. However, the left crura frequently become attenuated and bowed out laterally. In many crural repairs, 2-3 posterior stitches are adequate to close the hiatus. However, in those with large defects, placing more than 3 posterior sutures will create a “GEJ Shelf”. The multiple posterior stitches elevates the esophagus. After the hiatus, the GEJ drops posteriorly creating a partial mechanical obstruction leading to dysphagia. Instead of multiple posterior sutures, an anterior stitch can be considered, however a left cruroplasty can tighten the hiatus while maintaining the anatomic posterior location of the GEJ. These lateral sutures will also reduce the tension on the posterior repair.
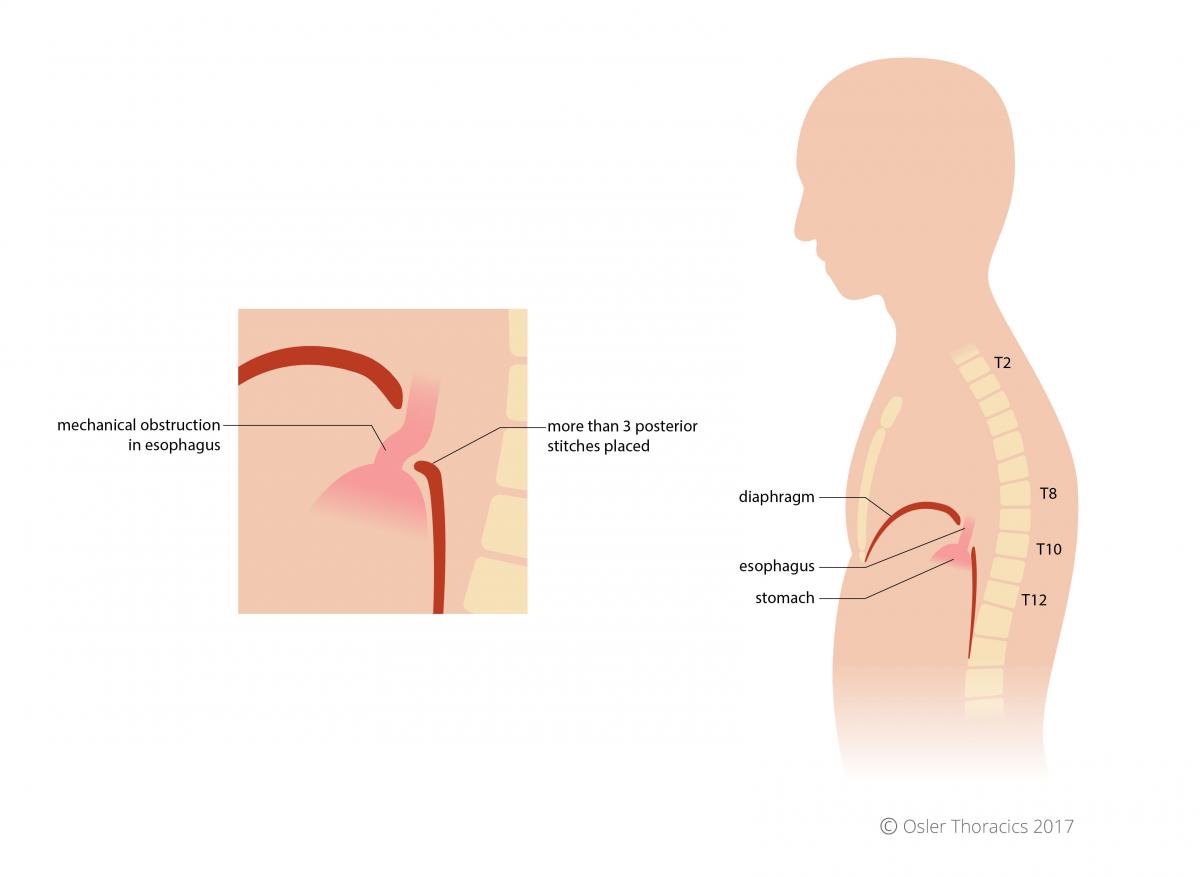
Figure 17: Mechanical obstruction of esophagus in excessive posterior crural stitches
Pearl #6: The Posterior PTFE Buttress Crural Mattress
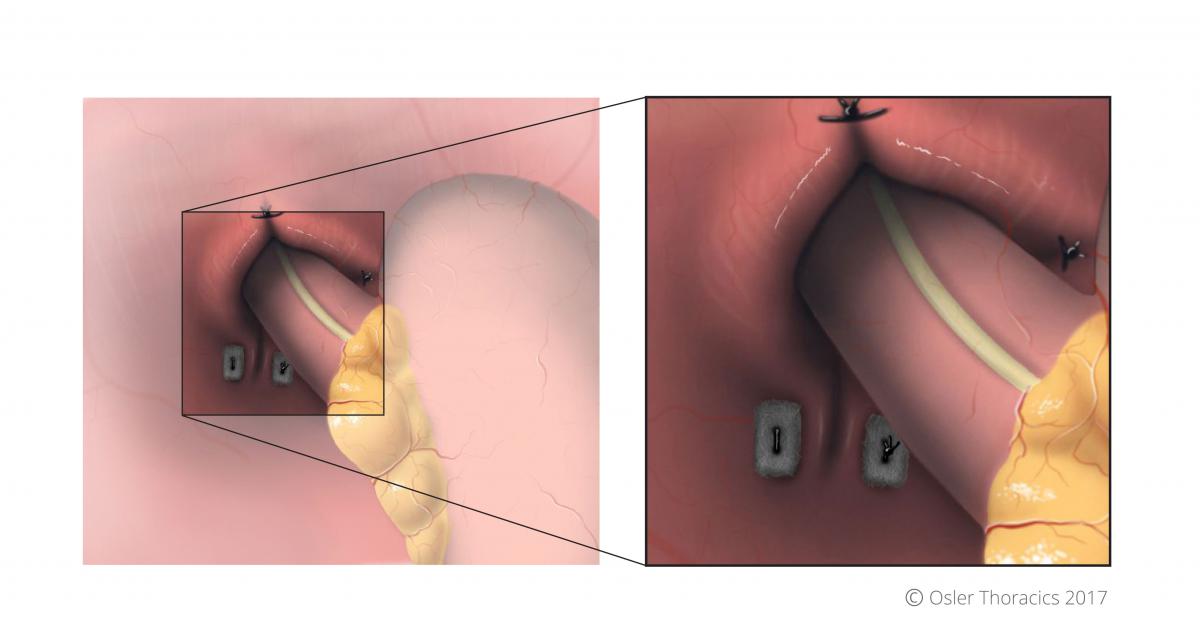
Figure 18: PTFE pledgets used in posterior crural stitches, with horizontal cruroplasty visble
Especially in cases where the peritoneal lining of the crura is disrupted, we routinely use PTFE pledgets to reinforce the most posterior part of the crural repair. This mattress suture reinforces the strength of the repair and still maintains a distance from the esophageal wall, preventing future erosion. We will always place a second, more anterior stitch closer to the esophageal wall.
360° Wrap or Gastropexy
Pearl #7: Pexy vs. Wrap: Perioperative Algorithm
Although the gold standard repair of a large hiatus hernia includes a fundoplication, there is renewed interest in the gastropexy. At Osler, the method used to secure the stomach within the abdomen depends mostly on the patient’s preoperative symptoms.
Pexy is performed on those with obstructive symptoms: bloating, dysphagia, epigastric pain.
Fundoplication is performed on those with reflux symptoms: heartburn, regurgitation, hoarse voice, adult onset asthma.
If a decision is made to proceed with a pexy, it is imperative that all other guidelines for a hiatus hernia repair are followed, including reduction of the sac, mobilization of the esophagus, and crural closure.
Technical aspects of a wrap:
- “Short gastric to short gastric wrap”: points 3 cm and 8 cm along the greater curvature are used to create the wrap.
- Create a floppy, 3-stitch wrap with first two stitches including stomach and esophagus.
- Gently pexy the wrap to the right crus.
- Place a clip on the most superior stitch to mark the highest part of the wrap. Any future plain films will identify the most superior part of the fundoplication.
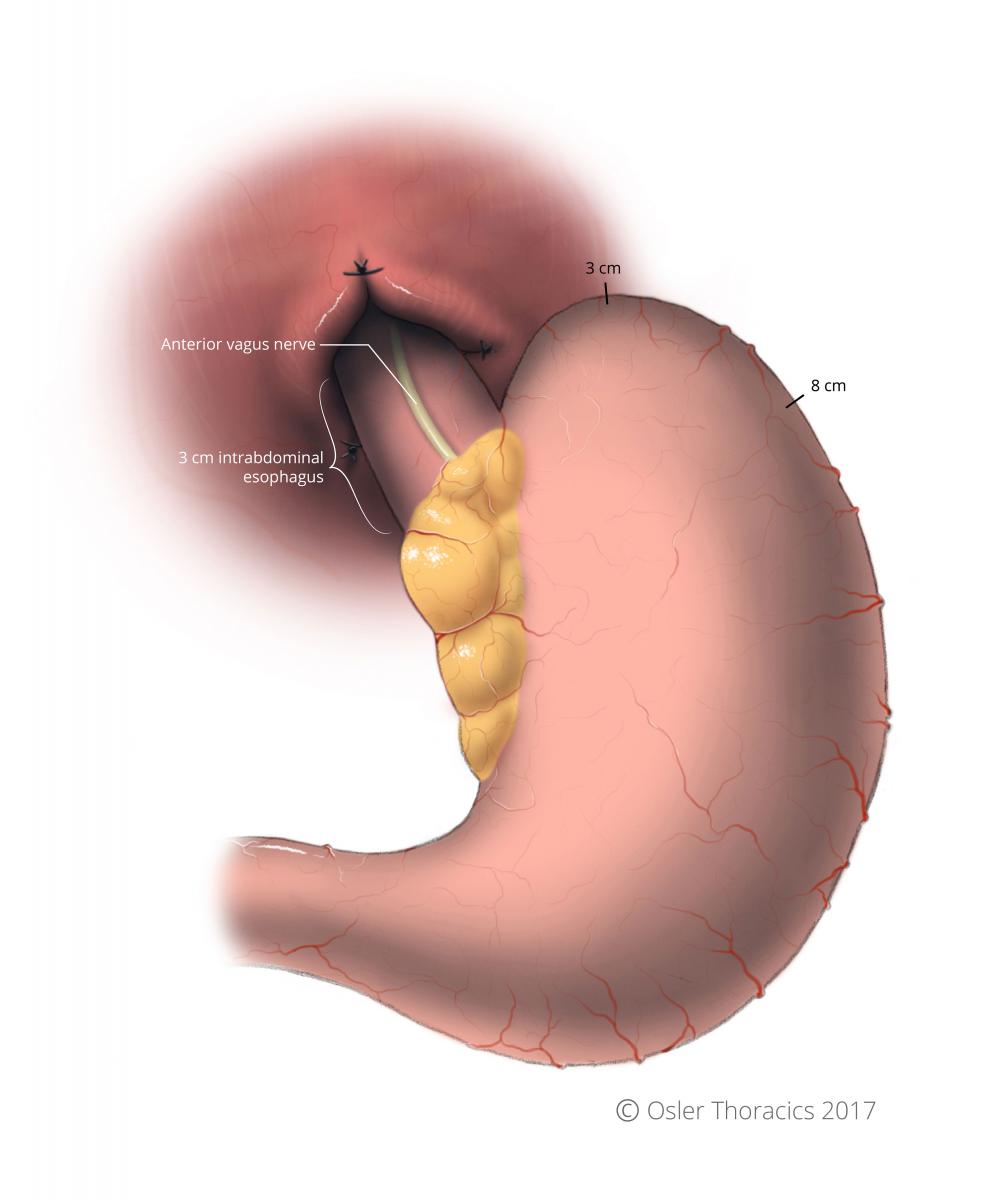
Figure 19: Reference points for fundoplication indicated, at 3cm and 8cm
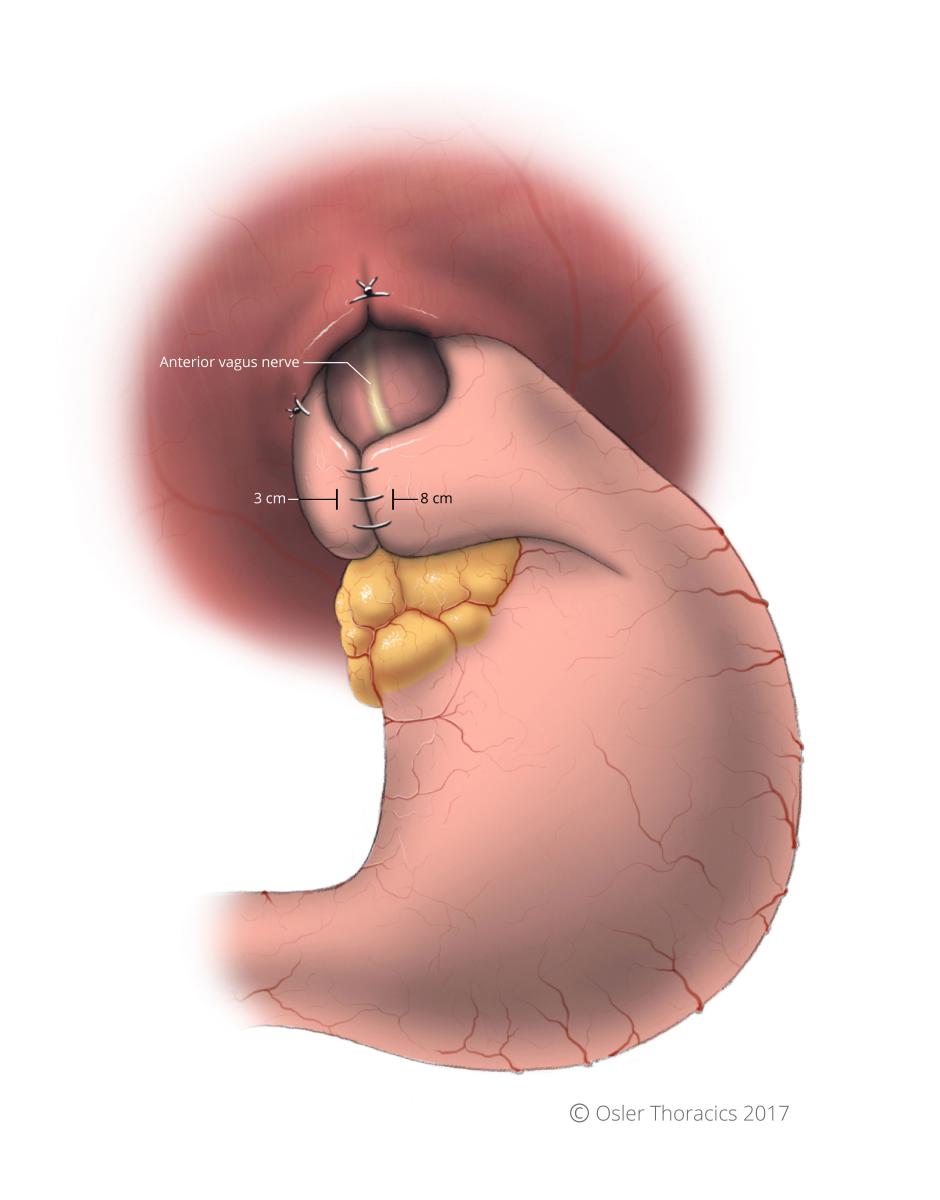
Figure 20: Completed fundoplication; anterior vagus nerve spared, not included in wrap
Technical aspects of a pexy:
- After introducing air into the pleural space, pexy the greater curvature to the lateral part of the diaphragm.
- Recreate normal gastric anatomy by placing 3 mattress sutures incorporating the stomach and the diaphragm at the level of the short gastric vessels.
- Do not continue tacking the stomach to the lateral abdominal wall, as this will create a kink at the angularis, with the potential for a gastric outlet obstruction.
- After appropriate closure of the crurae we use the anterior part of the hernia sac to cover the hiatus. This endogenous “mesh” can prevent future herniation of abdominal structures, like the transverse colon from herniating.

Figure 21: Completed pexy; notice the ‘floppy’ diaphragm as a results of introducing air into the pleural space

Figure 22: Incorrect pexy with stitches placed too later on diaphragm causes a kink in the angularis of the stomach
Pearl #8: Recognize the Tubularized Stomach Prior to Wrap or Pexy
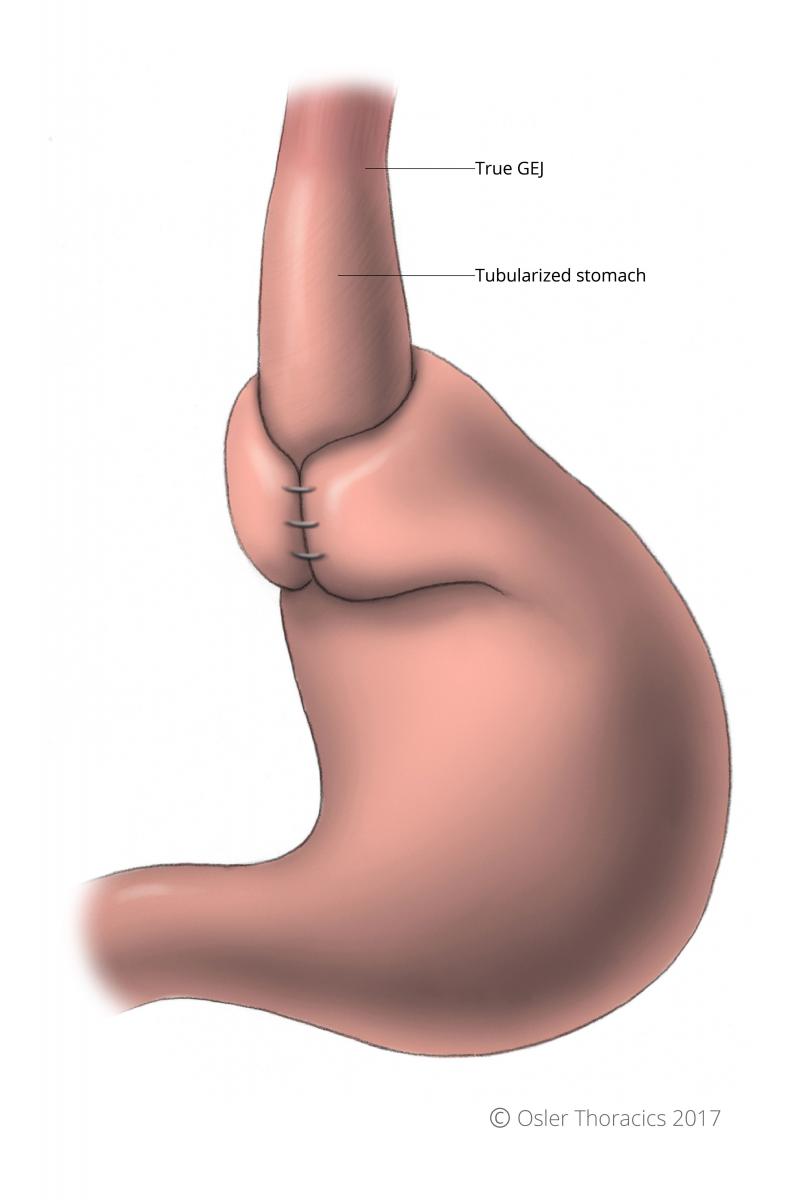
Figure 23: Tubularized stomach
The goal in reducing the stomach into the abdomen is to also ensure 2-3 cm of intrabdominal esophagus. It is critical to consider that both an esophageal bougie and CO2 insufflation can give the illusion of adequate esophageal length. As mentioned above, adequate mediastinal mobilization can usually provide the length required. Assessing the true location of the GEJ is critical in deciding where to place the fundoplication.
With a chronically herniated gastric cardia, the extrinsic compression from the crurae creates a tubularized stomach, which can fool even the experienced surgeon. If this is not recognized, the wrap may be inadvertently placed around this tubularized stomach. This has been inappropriately labeled the “slipped Nissen”, as the wrap was actually surgically placed in the “slipped” position. Unfortunately, if this occurs, the wrap can create a whole new set of disabling symptoms. The physiology is similar to placing a tight gastric band around the stomach: dysphagia, bloating, epigastric pain, early satiety. But unlike the band, the wrap cannot be adjusted without re-do surgery.
It is therefore critical to identify the true GEJ. Dr. Luketich advises to reflect the GEJ fat pad towards the right of the GEJ. This is an excellent way to identify the anterior change in the muscle fibers. In his dissection, he mobilizes the anterior vagus nerve off anteriorly, as well as the posterior vagus nerve. He subsequently places the wrap between the mobilized nerves and the esophagus. Although this absolutely guarantees a well position wrap, it can be a bloody dissection and may also lead to unnecessary vagal nerve injury.

Figure 24: Reflected GEJ fat pad; notice anterior vagus nerve, and change in muscle fibre direction indicating gastroesophageal junction
At Osler, we partially reflect the fat pad and vagus nerve to identify location where the longitudinal fibers of the esophagus intersect the sling fibers of the stomach. Not only will this clarify the true GEJ, it prevents incorporation of the anterior vagus nerve into the sutures of a fundoplication.