Treating adults with pectus excavatum (PE) typically falls under the responsibility of the thoracic surgeon. At William Osler Health System, we perform 20-30 Nuss procedures a year. Patients across Canada have travelled to the Brampton Civic Hospital for this procedure.
Initially we treated most adults with PE with the Ravitch procedure, however currently, using a modified Nuss procedure, we are achieving excellent cosmetic results.
Very few thoracic surgeons perform the Nuss because it’s use in adults is relatively new, and because the majority of thoracic surgeons are trained to focus primarily on surgical oncology. Consequently, expertise in this procedure is limited. Although it appears to be relatively simple, there are many nuances that can improve your patient’s satisfaction. Each PE case is unique and requires a customized procedure.
Positioning and Marking
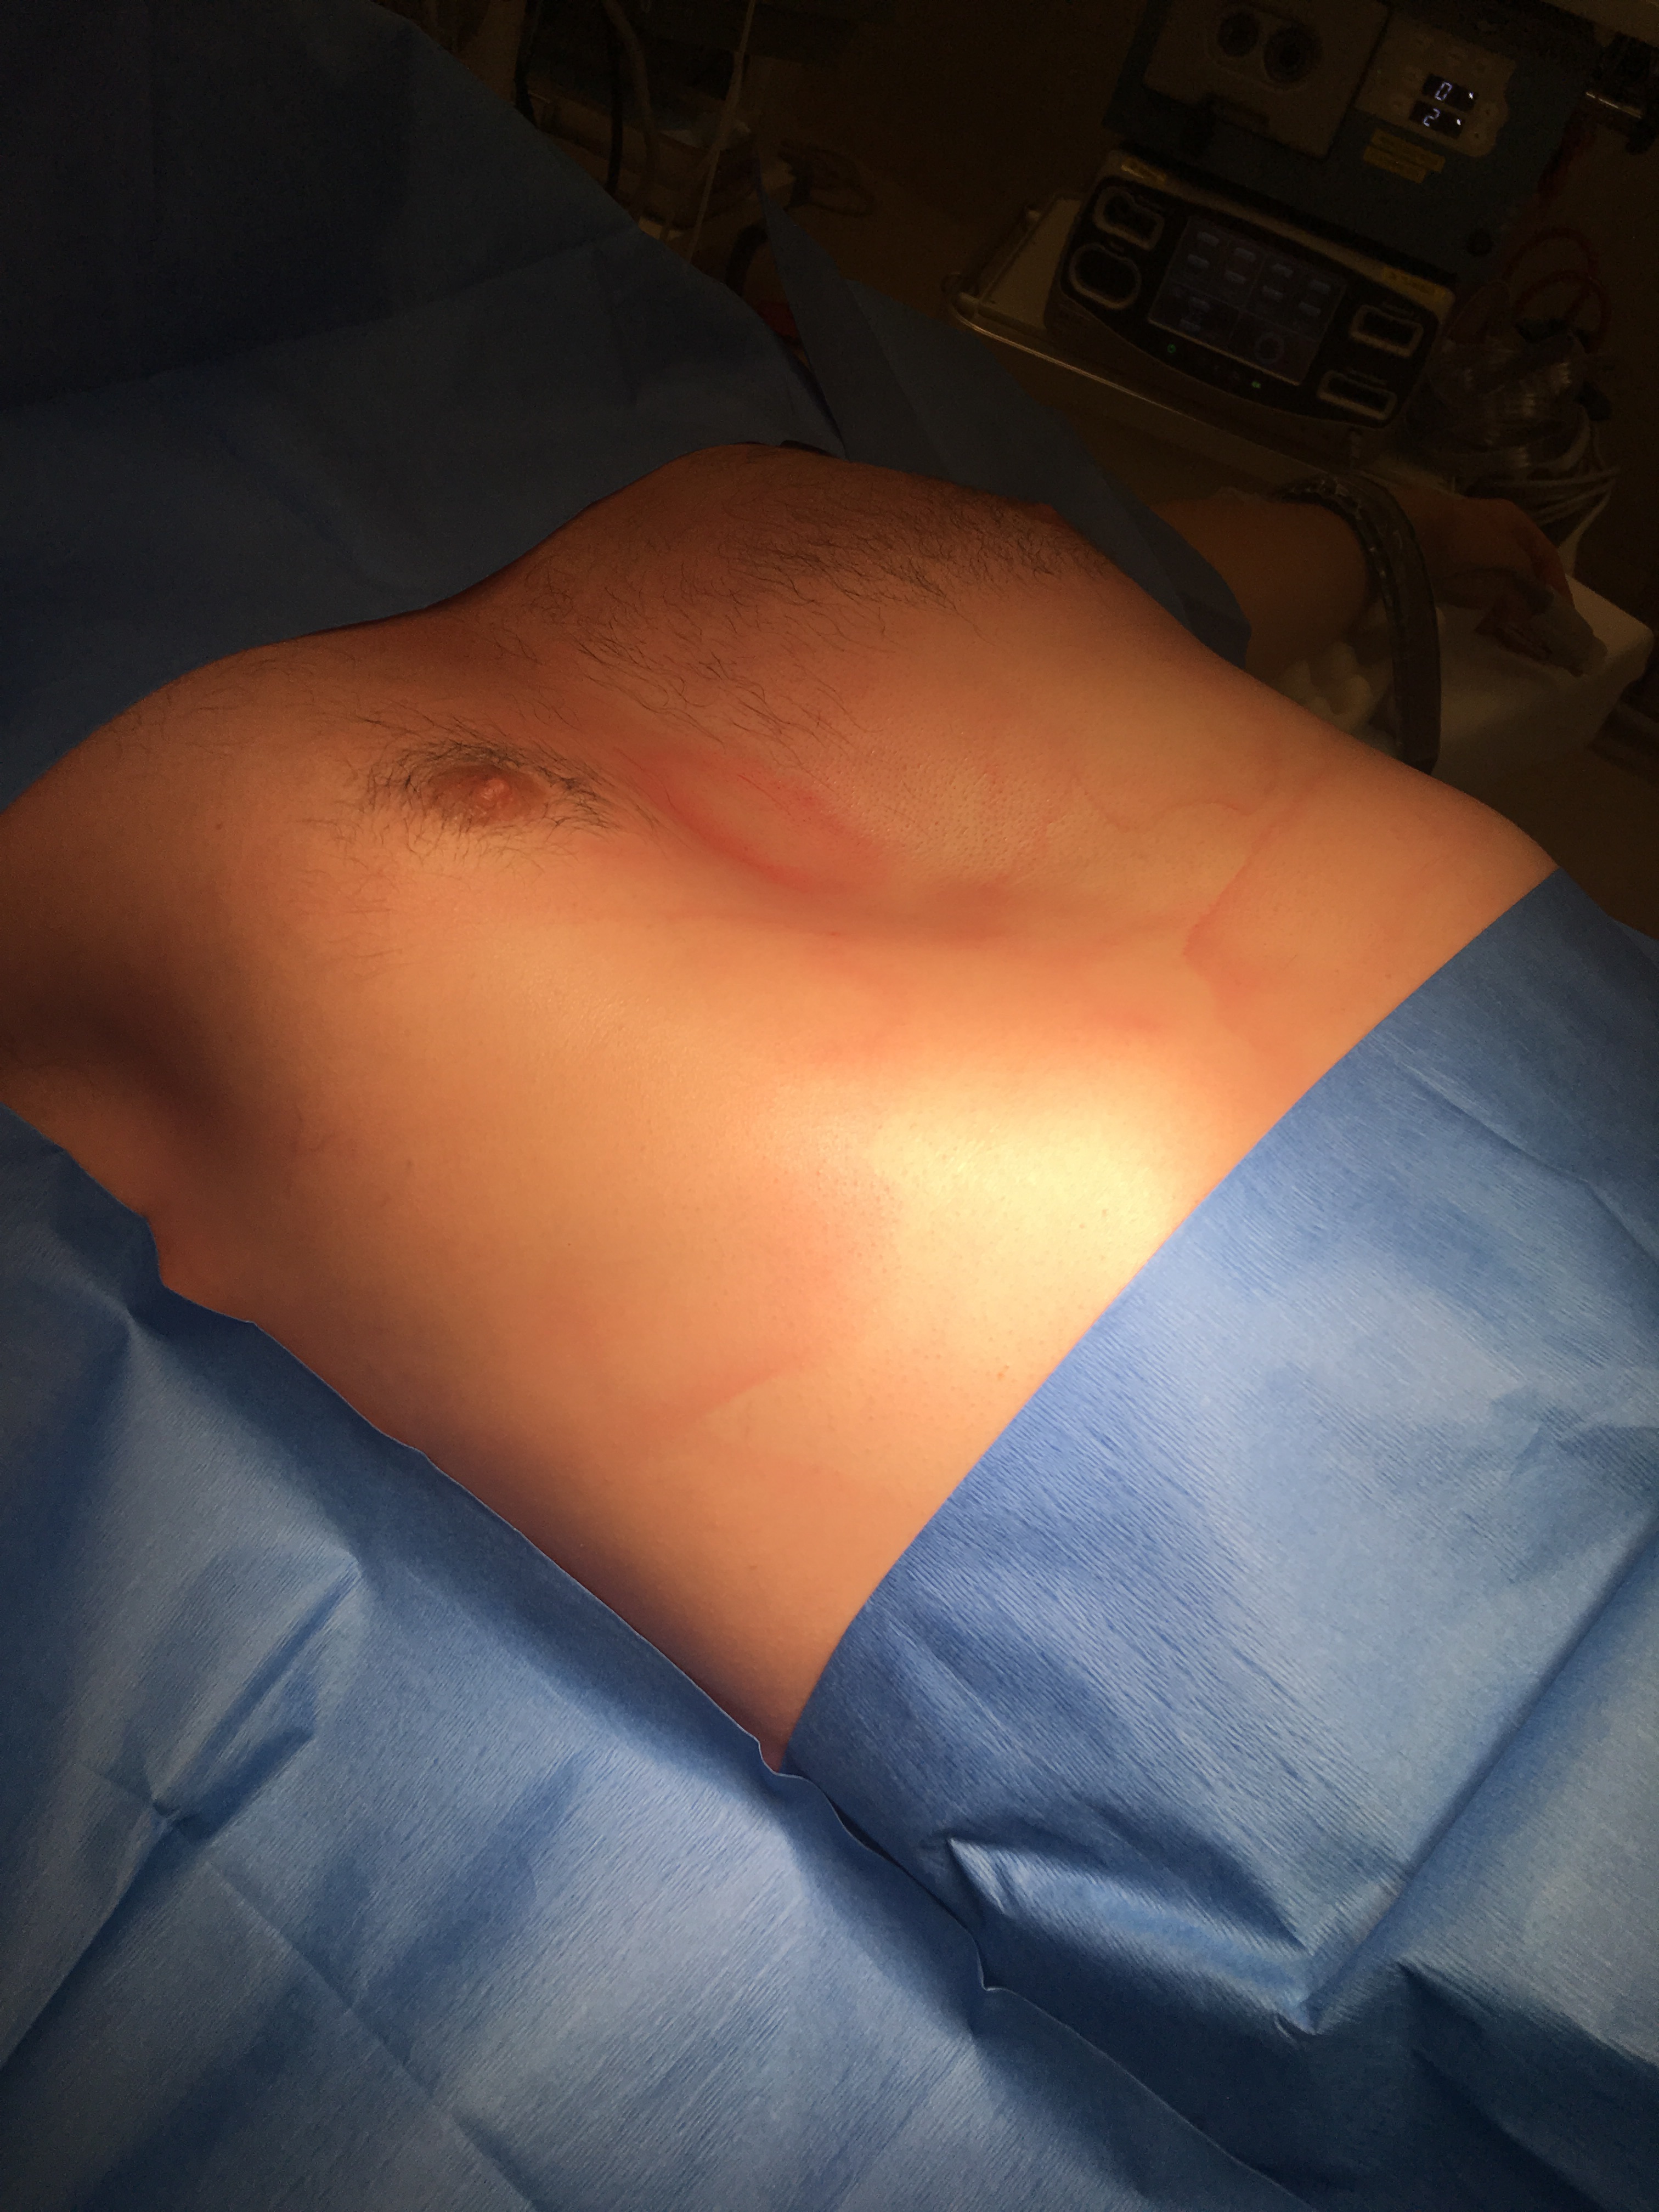
The patient is positioned with both arms abducted by 70° at the shoulders to allow access to the lateral chest-wall. A double lumen tube is not necessary as gentle insufflation in adequate to provide exposure of the anterior mediastinum.
Pearl #1: Draw on Your Patient
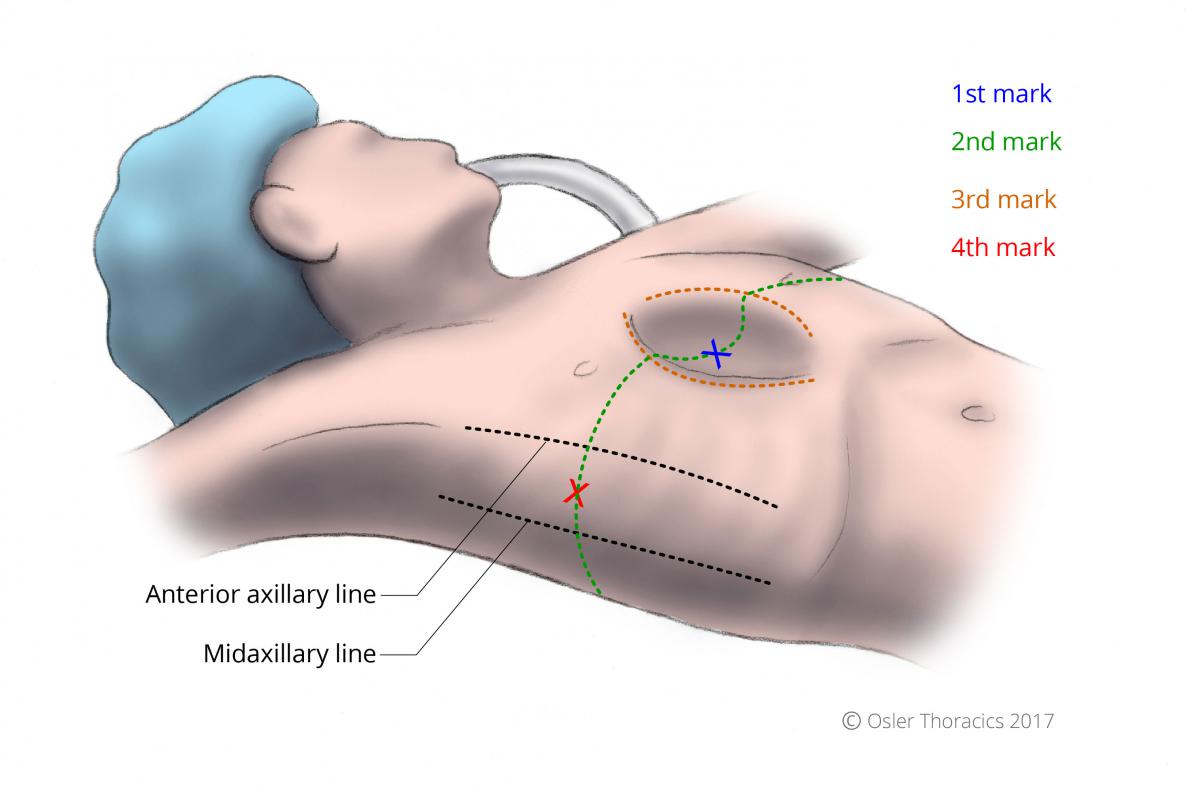
Figure 1: Reference lines and patient marking
1st Mark
Place an ‘X’ at the deepest portion of the pectus. If the deepest point of the pectus is inferior to the sternum, then mark the lower end of the sternum.
2nd Mark
Draw a line in the horizontal plane at the level of the 1st mark.
3rd Mark
Identify the Pectus Ridge: the vertical plane at the peak of the pectus concavity. Draw the lines on both sides of the chest wall. This marks the level where the bar will penetrate the intercostal space. In many cases the right pectus ridge is more lateral than the left.
4th Mark
Extend the horizontal plane to the lateral chest wall, and place an ‘X’ halfway between the anterior and midaxillary lines. This represents the midpoint for the transverse lateral incisions.
5th Mark
If the plan is to use a single bar, mark a 2.5 cm incision paralleling the intercostal space. The incision should be 3.5 cm if two bars are going to be used.
Quick Tip: Don’t measure your bar size immediately. The ideal time to decide on bar length is when the tunneler is in place crossing both intercostal spaces
Decide on One or Two Bars
Initially in our experience there was very little variation in our operation. All procedures involved placing one bar, with two stabilizers secured with steel wire.
Although most patients were very satisfied, some did not achieve optimal cosmetic results. As our experienced evolved we began using two steel bars in a subset of patients. The decision to use two bars can often be made pre-operatively.
Pearl #2: Two Bars is Often Better than One
Patients who have a better outcome with two bars include those with defects that begin high on the sternum (close to the sternomanubrial junction), as well as those with very deep defects.
The Long Defect: if one bar is placed in these patients, the repair looks unnatural with a resultant convexity that can be a major disappointment for the patient. The appearance would be similar to a patient with a mild pectus carinatum.
By placing two bars, one interspace apart, the sternum will look flat and more anatomic.
We have also found that patients with a deep PE, have disabling and frequently persistent pain if only one bar is used. Two bars dissipates the pain over the entire sternum, reducing post-operative analgesia requirements, length of stay, and overall satisfaction.
Incisions and Pockets
Make the incisions as described above. Use cautery and blunt dissection to create a pocket between the skin and the chest wall. If the plan is to use two bars ensure that your pockets are wider. The incisions are carried down to the chest wall.
Using your index finger extend your pockets medially up to the pectus ridge. This is the spot where the bar should enter/exit the pleural space
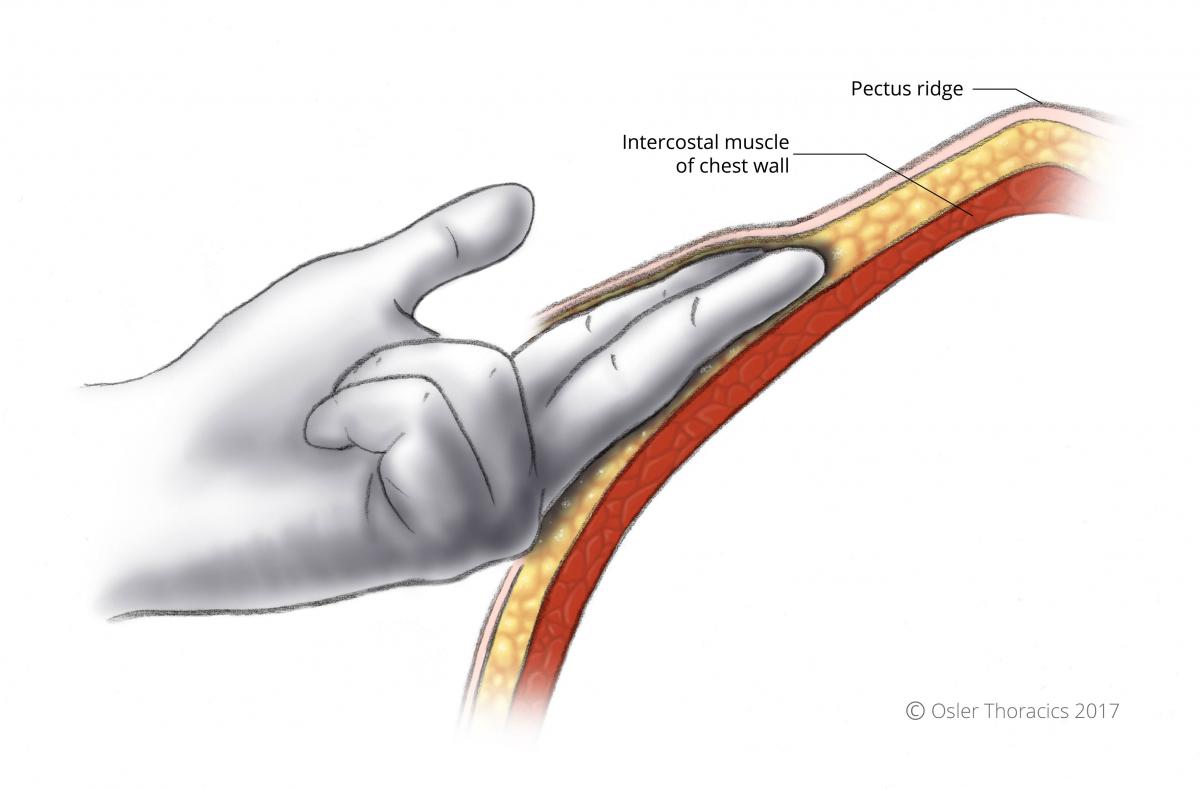
Figure 2: Blunt dissection extending towards pectus ridge
Pearl #3: Deep Pockets
The body’s reaction to the stainless steel bars can create a puckering of the skin superior to the Nuss apparatus. This can lead to significant breast tissue asymmetry. To prevent this we elevate the skin broadly around the incision. This prevents the puckering and also allows for easy implantation of a second bar if necessary.
Port Insertion and Insufflation
Two interspaces below the horizontal line at the mid-axillary line, we insert a 5 mm trocar. The dome of the diaphragm can be easily injured, so we aim the trocar towards the lung apex. We insufflate to 8 mmHg with a 30° scope.
Tunneling
In the Nuss set, there are three curved introducers.
Pearl #4: Use the Introducer that Best Matches the Curve of the Pectus Excavatum
Simply placing the introducer on the anterior chest wall and choosing the one that corresponds best to the defect is a simple way to choose.
The introducer is gently inserted into the pocket with the tip facing up. Once the marked pectus ridge is reached, the introducer is turned to create an indentation at the appropriate interspace. The concave part of the introducer is “punched” into the pleural space.
The tip is gently advanced into the substernal space with the tip in constant view.
The initial dissection is the most critical part for a bloodless tunnel: Avoid the right internal mammary vessels and ensure that the anterior fold of the pericardium is always posterior to the introducer.
Pearl #5: Anterior-Posterior/Side-to-Side
The initial tunnel is developed by using a gentle and repetitive anterior-posterior motion. Progress towards the contralateral side is achieved using this motion. The introducer should never simply be pushed through.
However, after a small amount of progress, the introducer can be moved side to side using a twisting motion of the wrist.
The side to side motion is critical because:
- It minimizes movement of the introducer at the level of the intercostal muscle, reducing muscle stripping
- Creates better visualization of the introducer tip preventing injury to the pericardium
- Allows for easy passage of the Nuss Bar
Pearl #6: Use the Left Hand to Feel the Tip
Visualization can be challenging once the bar is in the left hemithorax. Using the side to side motion, tactile feedback can indicate crossing of the sternum into an interspace. The left hand is placed in the left sided incision and a finger is placed into the marked interspace. Once the tip is palpable in the appropriate position the right hand is pushed down to gently “pop” the tip through the interspace.
Pearl #7: Pull up the Tip
Once the tip is through the interspace on the left side, it is important to resist the temptation to simply push the introducer further through the chest wall. If the introducer is pushed through its shaft will tear the intercostal muscle. Without this barrier the bar can easily migrate though the interspace and into the subcutaneous tissue. We place “FiberWire®” through the tip and secure it in place. The assist then pulls the introducer directly perpendicular to the patient pulling the introducer 4-5 cm out of the chest wall.
Pearl #8: Mould the Chest Wall
The sternum’s posterior pressure is significant and it is important to reduce this as much as possible prior to placing a bar. Once the introducer is in place, I leave it there for approximately 5 minutes during which I will repeatedly lift both sides while my assistant pushes the lower chest wall downward. These maneuvers can decrease the posterior sternal force which, if significant, can flatten a bar in-situ leading to a poor cosmetic outcome. I suspect that this maneuver will also reduce post-operative pain.
Choose the Bar Size
Pearl #9: Use a Short Bar
We have recently begun using much shorter bars in our adult population. Torque is a measure of how much a force acting on the bar causes the bar to rotate. If the bar is short, the angle of the extremities is more obtuse. A shorter Nuss bar is thus characterized by a shorter arm and therefore smaller torque acting on its sutures, leading to increased bar stability.
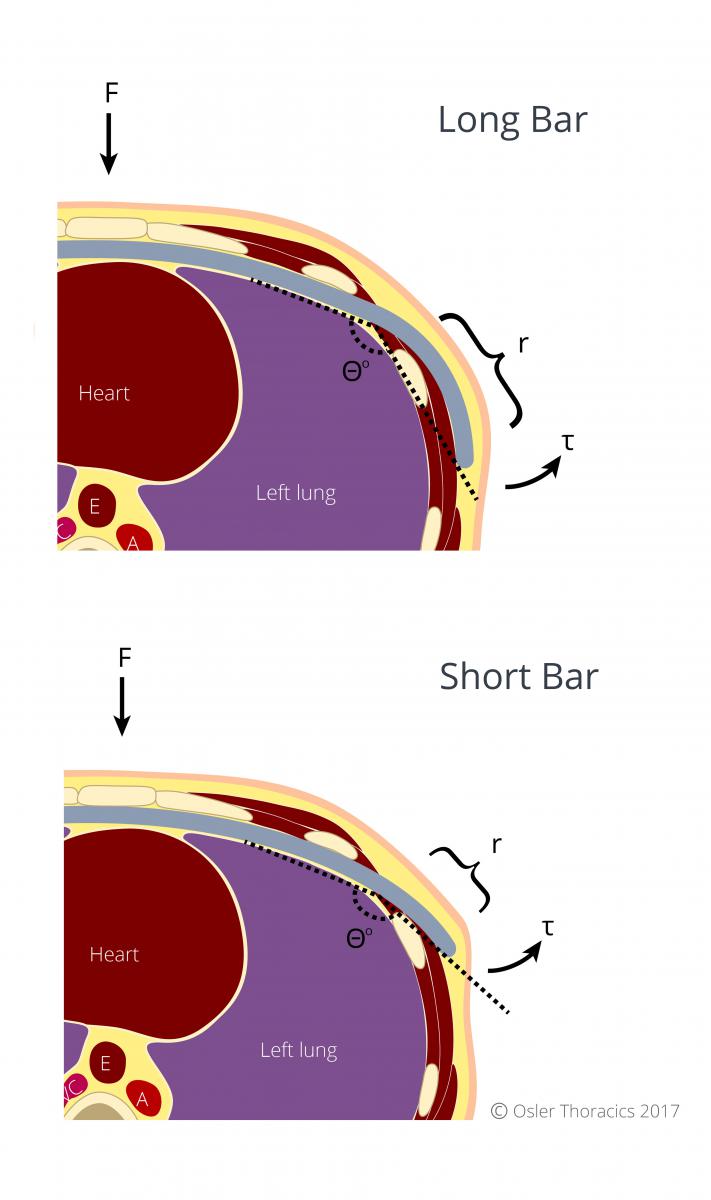
Figure 3: A shorter Nuss bar results in lower torque, thus a more stable bar
If a second bar is used, the lower bar is generally 1 inch longer.
Removal of the bar is also much easier as it is less curved.
We use a template curved to create the desired shape of the chest wall, with the length extending from the medial edges of the lateral incisions. Using this approach, the Nuss bar will sit in the middle of the incision.
Attach 2 FiberWire® to Introducer Tip
Once attached, the FiberWire® is pulled though guided by the thoracoscope. The introducer is pulled out in its curve to prevent intercostal muscle stripping.
The Bar is Bent to the Orange Mould
I generally do not bend the center of the bar, which is marked by a dot. This creates a completely flat surface for the sternum to lie on. I overcorrect the bar slightly to compensate for the inevitable flattening that occurs once the bar is flipped.
Flip and Bend Laterally
The bar is centered and flip clockwise. The in-situ benders are used to loosely oppose the chest wall so there is no visible protrusion of the bar. However, if it is too snug on the chest wall, the patient will have more pain, often complaining of a clicking sound on movement. The bar may also erode into the interspace making removal very challenging.
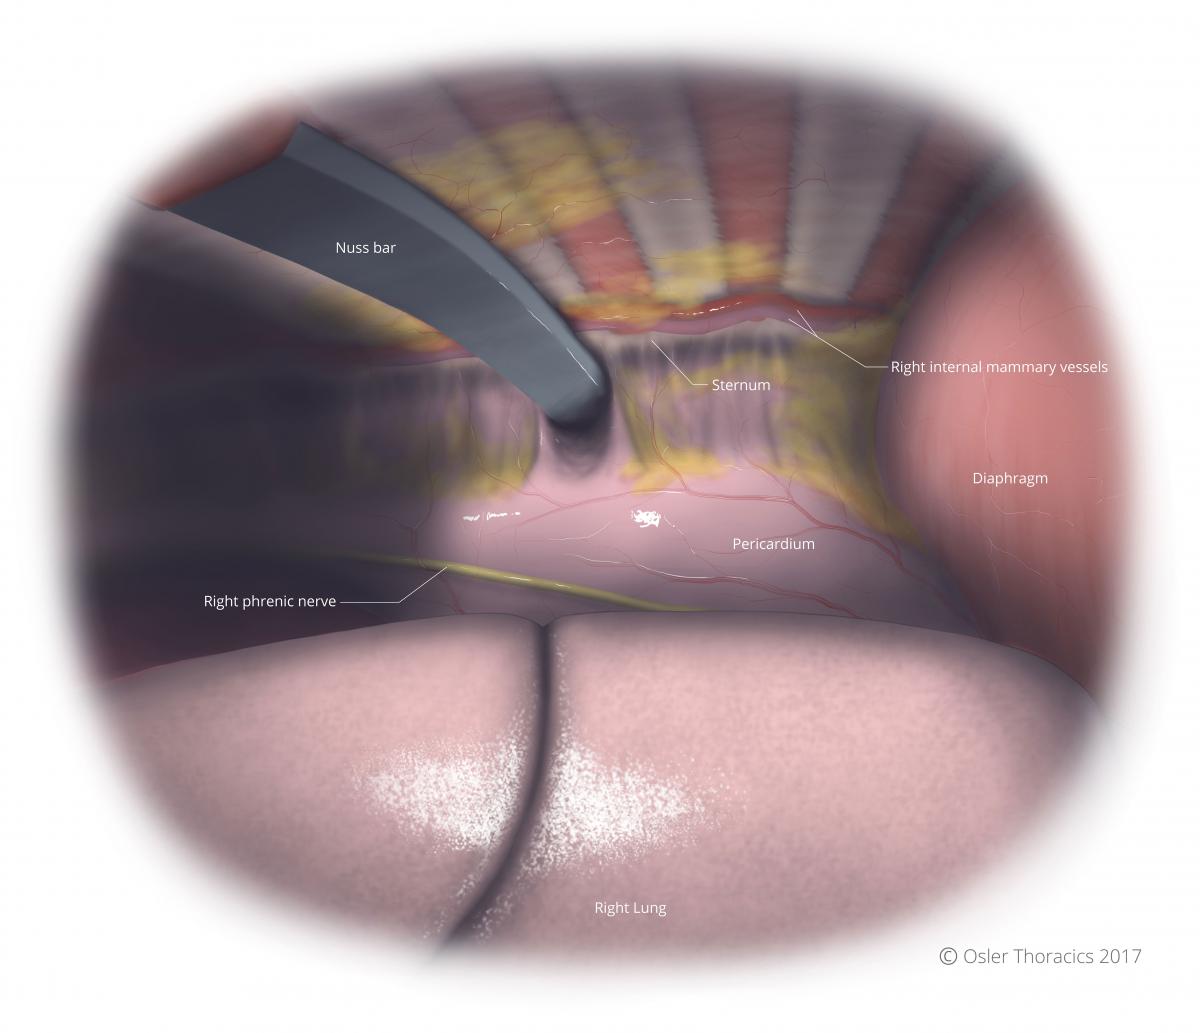
Figure 4: Intrathoracic view from patient’s right of Nuss bar in place
Stabilization
Pearl #10: 3-Point VATS Pericostal FiberWire® to Avoid Stabilizers
Bar displacement remains a major source of frustration for both patients and physicians. The gold standard approach is to use bilateral stabilizers. In many published series this approach has significantly reduced displacement rates.
However, at Osler we feel that stabilizers should be avoided as they are the main contributors to post-operative pain and wound complications. Movement and pressure of the stabilizer on the chest wall can cause excruciating pain. Wound complications may be due to the body’s foreign-body reaction or from tissue pressure necrosis.
In addition to this, the cosmetic appearance may also be poor due to the bulky stabilizer/Nuss bar interface.
As many patients with PE have a very lean build, bulky stabilizers may protrude even if the bar is molded tightly against the chest wall. This may be a source of dissatisfaction for the patient, despite a well reduced anterior chest wall.
At Osler, we use FiberWire® to perform a bilateral Nuss bar rib fixation. FiberWire® is an extremely strong suture made by Arthrex™, most commonly used by orthopedic surgeons to repair tendons in joints. The FiberWire® suture is constructed of a multi-strand, long chain ultra-high molecular weight polyethylene core with a braided jacket of polyester that gives FiberWire® outstanding strength.
We place three circumferential fixation sutures around the bar and the rib cage. It is critical to place the FiberWire® around two separate ribs to counteract any rotational forces that may lead to bar displacement.

Figure 5: Bar placement using a single Nuss bar

Figure 6: Three-point rib fixation using FiberWire®
This is performed using VATS guidance. We have since noticed a dramatic reduction in bar displacement and post-operative pain.
Pearl #11: When Stabilizers are a Must
The downward force on the Nuss bar is almost always asymmetrical. This generates a torque which induces bar displacement. It is counteracted by counter-torque provided by the surgical stabilization. The asymmetry of the force can be roughly assessed in the OR by directly inspecting the degree of sternal/bar opposition. Simply stated, if on VATS inspection the bar is not sitting flat on the sternum, the torque on the extremities of the bar is increased, resulting in a high likelihood of the bar displacing.
If we notice the bar is not flush against the sternum, we will flip the bar towards the other side. If this is not successful, we may redo the tunneling and bar placement. However, we have noticed that despite these maneuvers, the bar often remains slightly angulated. It is in these cases that we add a stabilizer to counteract the torque.
Pearl #12: Leave the Bar in for 3-3.5 Years
As the chest wall in adults is less pliable than in kids, we generally leave the bar in for at least 3 years. If the bar is removed prematurely there is a strong chance there will be a slight recurrence.
Gallery